If you work in a secure cloud environment, you have probably faced this problem: You need to access an EC2 instance or RDS database in a private subnet, but you are not allowed to create a Public IP.
Maybe your organization has a Service Control Policy (SCP) blocking public access, or maybe you just want to follow security best practices. The solution is AWS Client VPN.
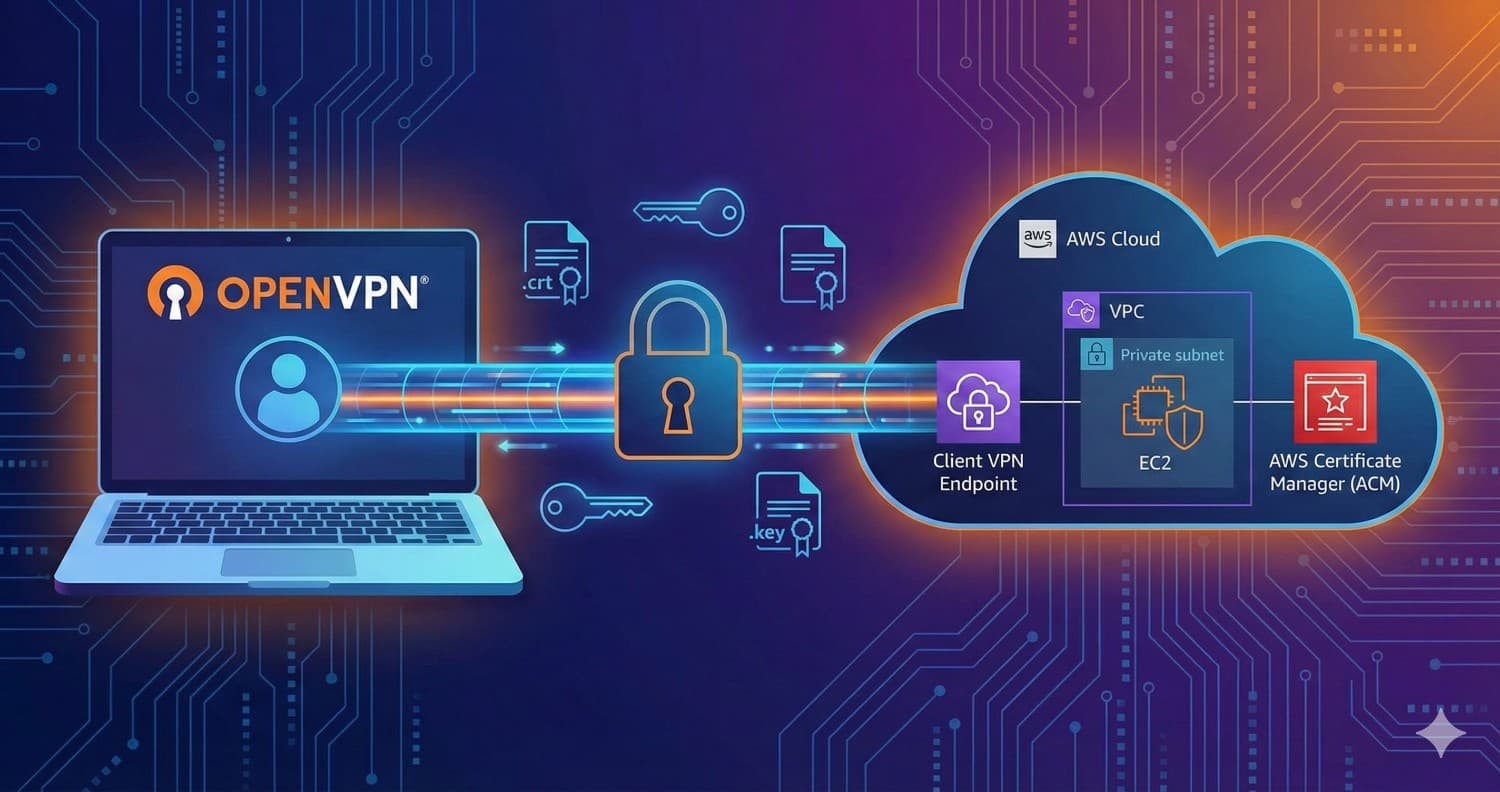
Unlike a "Bastion Host" (which requires managing another EC2 instance), Client VPN is a managed service that scales automatically. In this guide, I will walk you through setting up a secure, certificate-based VPN using OpenVPN and AWS.
🛠️ Prerequisites
Before we start, make sure you have:
AWS CLI installed and configured.
Git installed on your local machine.
OpenVPN Client (like OpenVPN Connect or Tunnelblick).
Step 1: Generate the Certificates (The "Keys")
AWS Client VPN uses mutual authentication. This means both the Server (AWS) and the Client (You) need certificates to trust each other. We will use a tool called easy-rsa to generate these.
Open your terminal and run the following commands:
git clone https://github.com/OpenVPN/easy-rsa.git
cd easy-rsa/easyrsa3
./easyrsa init-pki
./easyrsa build-ca nopass
./easyrsa build-server-full server.vpn.local nopass
./easyrsa build-client-full client.vpn.local nopass
You now have three critical sets of files in your pki folder.
Step 2: Upload Certificates to AWS
From AWS CLI
Now we need to tell AWS to trust these certificates by uploading them to AWS Certificate Manager (ACM).
Since we generated these locally, we will upload them via the AWS CLI for speed.
1. Upload the Server Certificate: Notice the filename matches the name we created in step 1 (server.vpn.local).
aws acm import-certificate --certificate fileb://pki/issued/server.vpn.local.crt --private-key fileb://pki/private/server.vpn.local.key --certificate-chain fileb://pki/ca.crt
2. Upload the Client Certificate to ACM: Notice the filename matches the name we created in step 1 (client.vpn.local).
aws acm import-certificate --certificate fileb://pki/issued/client.vpn.local.crt --private-key fileb://pki/private/client.vpn.local.key --certificate-chain fileb://pki/ca.crt
Note: Copy the CertificateArn returned by these commands. You will need the Server Certificate ARN when creating the VPN Endpoint.
From the AWS Console
- Prepare your files First, copy the generated certificates from your terminal folder to a location your browser can access (like your Desktop or Downloads folder).
mkdir /home/vpn-certs
cp pki/issued/server.vpn.local.crt /home/vpn-certs/
cp pki/private/server.vpn.local.key /home/vpn-certs/
cp pki/issued/client.vpn.local.crt /mnt/c/vpn-certs/
cp pki/private/client.vpn.local.key /mnt/c/vpn-certs/
2. Import Server Certificate
Log in to the AWS Console and search for Certificate Manager (ACM).
Click Import a certificate.
Open your text files and paste the contents into the matching boxes:
Certificate body: Paste contents of server.vpn.local.crt
Certificate private key: Paste contents of server.vpn.local.key
Certificate chain: Paste contents of ca.crt
Click Import.
3. Import Client Certificate Repeat the import process, but use the client files:
Certificate body: Paste contents of client.vpn.local.crt
Certificate private key: Paste contents of client.vpn.local.key
Certificate chain: Paste contents of ca.crt (Same chain file)


Step 3: Create the Client VPN Endpoint
Now we configure the actual VPN service in the AWS Console.
Navigate to VPC Console -> Client VPN Endpoints -> Create Client VPN Endpoint.
Name Tag: My-Dev-VPN
Client IPv4 CIDR: 10.100.0.0/22
- Tip: This IP range must NOT overlap with your VPC's CIDR.
Server Certificate ARN: Select the server certificate you just uploaded.
Authentication Options: Select Use mutual authentication.
- Client Certificate ARN: Select the client certificate (or the server one again; as long as the CA matches, it works).
Split-tunnel: ✅ Enable this!
- Why? This ensures only traffic for AWS goes through the VPN. Your Zoom calls and Google searches stay on your fast local internet.

- Click Create Endpoint.
Step 4: Associate Network & Authorize Access
The VPN is created, but it's not "plugged in" to your network yet.
1. Associate with Target Network:
Click your new Endpoint -> Target Network Associations tab -> Associate Target Network.
Select your VPC and the Private Subnet where your instances live.
Wait: This takes about 5–10 minutes to verify.

2. Authorize Ingress:
Go to the Authorization Rules tab -> Add authorization rule.
Destination network: 0.0.0.0/0 (This allows access to the entire VPC network).
Grant access to: Allow all users.

This is the part where most people get stuck. The configuration file downloaded from AWS is just a template; it is missing your personal "digital keys." We are going to merge everything into a single, easy-to-use .ovpn file.
1. Download the Template
2. Edit the File Open the downloaded file in a text editor (like VS Code or Notepad). You need to make two main changes:
The DNS Fix: Find the line starting with remote. AWS endpoints often require a random string prefix to avoid DNS caching.
The Certificate Embed: Locate and remove the lines cert and key if they exist. Then, append your certificate data to the very bottom of the file.
3. The Final Structure Your final file should look like the example below.
⚠️ Important: Do not copy the keys below. You must paste the actual text from the files you generated in Step 1.
client
dev tun
proto udp
remote cvpn-endpoint-0axxxxxxx02.prod.clientvpn.us-east-1.amazonaws.com 443
remote-random-hostname
resolv-retry infinite
nobind
remote-cert-tls server
cipher AES-256-GCM
verb 3
reneg-sec 0
verify-x509-name server.vpn.local name

<ca>
-----BEGIN CERTIFICATE-----
(Paste content from pki/ca.crt here)
-----END CERTIFICATE-----
</ca>

<cert>
-----BEGIN CERTIFICATE-----
(Paste content from pki/issued/devops-user-1.crt here)
-----END CERTIFICATE-----
</cert>

<key>
-----BEGIN PRIVATE KEY-----
(Paste content from pki/private/devops-user-1.key here)
-----END PRIVATE KEY-----
</key>
- Save this file as
my-aws-vpn.ovpn.

Step 6: Connect & Onboard New Users
Import your my-aws-vpn.ovpn file into your OpenVPN client and click Connect. You should now be able to ping your private EC2 instances (e.g., ping 172.31.x.x).
🎁 Bonus: How to Onboard a Colleague (User-2)
The beauty of this setup is that you don't need to touch the AWS Console to add a new team member! As long as you have your "Master" ca.crt file, you are the gatekeeper.
1. Generate New Keys Go back to your easy-rsa folder on your local machine and run:
cd easy-rsa/easyrsa3
./easyrsa build-client-full devops-user-2.vpn.local nopass
2. Create their Config
Take your existing working .ovpn file and make a copy of it.
Keep the <ca> section exactly the same (everyone uses the same Root CA).
Replace the text inside the <cert> and <key> sections with the contents of the new files:
3. Secure Distribution Send the newly created .ovpn file to your colleague.
💡 DevOps Security Tip: Because this file contains a Private Key, never send it over unencrypted channels. Use a secure method like a password-protected file, a secure corporate drive, or an encrypted messaging platform.
🛠️ Troubleshooting: Common Issues & Solutions
Even with a perfect setup, you might run into these common "gotchas." Here is how to fix them:
1. "TLS Handshake Failed" or Connection Timeout
This is the most common error. It usually means the client cannot reach the AWS VPN endpoint at all.
The Fix: Check your Security Groups. The Client VPN has a Security Group associated with it. Ensure it allows outbound traffic to your VPC. Also, verify that your local network (e.g., office or home WiFi) isn't blocking UDP port 443.
The DNS Fix: Re-check your .ovpn file. Ensure you added a random string to the beginning of the remote URL (e.g., random.cvpn-endpoint-xxx...).
2. Connected to VPN, but cannot Ping the EC2 Instance
If the VPN says "Connected" but you can't reach your resources, it’s usually a routing or authorization issue.
Check Authorization Rules: Ensure you have a rule in the AWS Console under Authorization Rules that grants 0.0.0.0/0 (or your specific VPC CIDR) access to all users.
Check Route Tables: Go to the Route Table tab of your VPN Endpoint. Ensure there is a route pointing to your Target Subnet.
EC2 Security Group: This is a big one! Your EC2 instance’s Security Group must allow inbound traffic from the Client VPN IPv4 CIDR (the 10.100.x.x range you chose) or from the VPC CIDR.
3. "Internet is not working" when VPN is ON
If you can access your EC2 but can't open Google or Slack, your VPN is likely in Full-Tunnel mode without a path to the internet.
- The Fix: Enable Split-tunnel in the AWS Console under the "Modify Client VPN Endpoint" settings. This tells your computer to only send AWS-destined traffic through the tunnel and use your local ISP for everything else.
4. "Verification Failed" or Certificate Errors
This happens if the certificates were not generated or pasted correctly.
- The Fix: Ensure that when you pasted the keys into the
.ovpn file, you included the -----BEGIN...----- and -----END...----- lines. Also, double-check that you used the Private Key (from the private folder) in the <key> section, not the certificate file again.
5. Long "Pending" state during Association
When you first associate a subnet, it stays in the associating state for a long time.
- The Fix: Patience! It usually takes 10 to 15 minutes for AWS to provision the network interfaces behind the scenes. Don't delete it; just wait for it to turn green (Available).
6. Subnet Size Requirements (CIDR Block)
When associating a target network (Subnet) with your VPN, AWS has a specific requirement for the subnet size.
The Issue: If you try to associate a subnet that is too small (e.g., /28, /29, or /30), the association will fail or throw an error.
The Fix: Ensure the subnet you are associating is a /27 or larger (e.g., /26, /25, /24). AWS needs this extra "room" in the subnet to create the Elastic Network Interfaces (ENIs) that manage the VPN traffic.
Conclusion
You now have a production-grade VPN setup. It bypasses public IP restrictions, encrypts your connection, and allows you to manage user access without ever sharing an SSH key or opening a firewall port to the public internet.
Happy Tunneling! 🚀